Sunday, March 8, 2009

Walk at Little India

My girlfriend and I wanted to take a little walk along Little India for our photoshoot. I had been to Little India for shoot before so I wasn't expecting much. But this time round, surprisingly there were many things to shoot. From colourful vegetables to beans in gunny sacks and flowers etc, it was definitely worth the trip.

Weighing your beans by the kg

and dried chilli....


wow so healthy! lotsa beta carotene


and more!


fresh lovely tomatoes.


and a cup of Ice Teh Tarik to cool you down..

Saturday, February 21, 2009

Chwee Kueh (aka Steamed Rice Pudding)

Chwee Kueh is one of my top local favourite snacks and it is actually steamed rice pudding eaten with chopped turnips. I came across this recipe in a local kueh recipe book. It looked easy so I decided to try it but it wasn't so easy after all. My chwee kueh turned out to be hard, sticky and spongy. Maybe I suggest adding a little more water, using wheat starch and a little less rice flour. Or not to exceed 10 min of steaming. Maybe some veteran who sees my blog can give me a tip or two.


Rice pudding:
350g rice flour sifted
40g tapioca flour sifted
20g wheat starch (I didnt have wheat starch so I used corn starch)
600ml water
750ml boiling water
1tsp salt

Filling:
150g chopped salted turnip (chai por)
1 tbsp minced garlic

Seasoning:
3 tsp light soy sauce
1 tsp pepper
2 tsp sugar


Blend rice flour, tapioca flour, wheat starch and salt with water and mix well till smooth.
Pour boiling water into it and mix well.
Grease small baking cups with oil thoroughly.
Pour mixture into cups and steam at high heat for 10min.
Remove and let cool.

Fry garlic with 2 tbsp of hot oil.
Stir till fragrant. Add chopped turnip and add seasoning. Fry till fragrant. Keep warm on low heat.
Serve chwee kueh with turnip topping.

Thursday, February 12, 2009

Mini Mocha Cakes

More sweet stuff coming your way. Forget about the weighing scale. Eat and be merry! It's all about indulgence and feeling happy! V Day follows after CNY, so there you have it! Sweet desserts to feel sweet and loved.


The combination of chocolate and coffee is known as mocha. These mini mocha cakes are dusted with icing sugar... that makes it so beautiful and yummy..


All you need are:


100g butter (softened)
80g light brown sugar
2 eggs
2 tsp coffee mixed with 1 tsp warm water
75g self raising flour
20g cocoa powder

Steps:
1. Cream butter + sugar till light and fluffy
2. Beat egg and add in diluted coffee powder
3. Add egg mixture into butter mixture
4. Fold in sifted flour and cocoa powder
5. Pour into about 7 cups and bake at 180deg C for 20 min.
6. Sprinkle some icing sugar, or add buttercream and add a piece of the cake cut on top.

Time taken: <45min

(Source adapted: The Usborne Children's Book of Baking)

Tuesday, February 3, 2009

Ice Cream Puff

You see, I can't get enough of cream puffs : ) More yesterday..but a different way of placing the melted chocolate.


It was the 2nd day of Chinese New Year and we had lots to eat. Lo Hei, our lunch, and many different desserts. I baked a carrot cake and a sponge cake. On top of that. we also had Cheng Teng, all after our heavy lunch. But I had to give this Ice Cream Puff a shot, or I dont know when I would have the time again.


It was an improved version from my earlier cream puff. This time, I greased the baking paper on the tray with butter and let tap water run over it for a few seconds before placing the batter on the paper. It allowed the puff to stay intact as a whole rather than stick to the paper and cause a hole at the bottom and I can't fill anything in the puff. This time, it turned out perfectly alright, with a complete puff on top and bottom. The water also helps the puff to rise.


I stuffed a tbsp of Ben & Jerry's organic strawberry ice cream into the puff when it was cooled. I drizzled some Lindt dark chocolate over it then followed by some chopped nuts. It was awesome! You should try it too. Altogether it took me only <50 mins

Monday, January 26, 2009

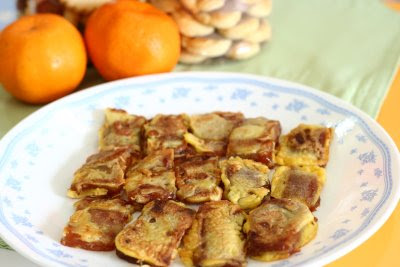
Pan Fried Nian Gao

This is the time of the year to enjoy snacks like Bak Kwa, Fried Nian Gao, Pineapple Tarts and many many other festive goodies. It is a yearly routine that we fry nian gao at home. It is a cake made from glutinous rice and consumed in Chinese cuisine. It is considered good luck to eat nian gao during this time because "nian gao" is a homonym for "every year higher and higher." 年糕 - 年高 (Source: WIkipedia)


All you need:

300g Nian Gao (brown colour looking cake)
3 eggs
3/4 cup plain flour (sifted)
Some water

Dip cut pieces of nian gao in the egg batter (not too thick nor watery) and fry in hot oil. Serve with Chinese tea. If anyone has a better alternative recipe to what I have, pls feel free to share as mine may not be the best :)

Saturday, January 24, 2009

Pineapple Tarts

Everyone around me was making pineapple tarts. My online blogger contacts, my friends and my relatives. I've only recently attempted baking but I thought, why not give it a shot? I first tried it at my friend's place. It was pretty easy and fun! So I decided to do it my own, my way. So here's the recipe for everyone.

The equipment needed...

Pineapple Filling (150 tarts)

3 pineapples (grated and sieved to drain off pineapple juice)
300 g sugar (I reduce this by 20% to make it less sweet. Can use partial brown partial castor sugar)

Cook and stir for about 20min. Add sugar and continue stirring till it becomes sticky and dark yellow. Whole process would take about 30-45 mins. When cooled, roll them into small balls.

Pastry
300g butter
130g margarine
100g icing sugar
80g milk powder
1 egg
800g cake flour/plain flour

Preheat oven to 180deg C. Cream butter/margarine in a large mixing bowl until light and creamy. Add egg and beat well. Sift sugar, powder and flour into the mixture. Fold to incorporate all ingredients into a smooth pastry. Let it set for 30min. Mixture should be a bit crumbly. Roll on a flat surface with a rolling pin and use the cutter to cut into tart shapes. Glaze with an egg. Place balls onto each tart and bake for 10-12 min.

Glazing with the egg


Viola! Finish it with a Fu sticker on top, with compliments from my friend Jaime :)

Sunday, January 18, 2009

Matcha Cake

I was in one of my 'baking mood' again. So with some leftover green tea powder bought a while back, I whipped up a chiffon cake with green tea, with referecnce from Alex Goh's Fruity Cake book. I added some dark chocolate for the extra added flavour. You can't really go wrong with chocolates in anything. :)


Mix 70g milk, 1 1/2 tsp green tea powder together till well blended, then and add 70g (I use margarine as my butter was hard as a rock) and cook till butter melts. Sieve in 90g of plain flour till well combined. Add in 4 egg yolks and mix well. Separately, whip 4 egg whites until foamy, then add 100g sugar and 1/8 tsp cream of tartar till soft peaks form. Add a third of this meringue into the green tea mixture and mix well, then add remaining meringue into it. You can add 120g of chestnuts if required (but I didn't). Bake at 170 deg for 35mins. I added additional 2 squares of dark chocolate (melted) and swirl it on top.

Remove cake when cool from the mould. Optional: cover cake in whipped topping cream if desired and dust with some green tea powder.