Thursday, October 30, 2008

Egg Tarts

Care for an afternoon snack?

Here's the recipe of my favourite dim sum item :) It's relatively easy to prepare. The challenging part is the crust of the tart, not so much the egg filling. I didn't have any egg tart trays so I used the muffin cups instead. It looks a bit disastrous.. :P But the taste is not too bad for a first timer!

Try this recipe and give me some feedback.


Makes 6-8

175g plain flour (sifted)
20g icing sugar
90g chilled butter
1 egg yolk
2 tsp cold water

Crust

1. Sift flour and sugar together in a large mixing bowl.
2. Cut butter into cubes and add into bowl.
3. Rub butter into flour with fingertips until mixture looks like fine breadcrumbs.
4. Add egg yolk into water and beat lightly.
5. Add egg mixture into bowl and carry on rubbing the pastry into a firm dough.
6. Grease tart trays with butter and roll out dough into the tray, slightly over the edges.

Preheat oven to 220 deg C.

Egg Filling

45 g caster sugar
120 ml water
3 eggs, beaten
1/2 tsp vanilla extract
80 ml canned evaporated milk (I use low fat evaporated milk. You can use leftover milk for Steam Chocolate Cake)

1. Boil water with sugar. When bubble forms, off fire.
2. Sieve egg mixture into the sugar water.
3. Whisk together, followed by the vanilla essence and milk.
4. Whisk further and sieve it into the pre lined trays.
5. Bake for about 20min.

Tip: they must be eaten fresh. Keeping them overnight will not taste as good.

(Source adapted: All Receipes and Usborne Children's Book of Baking)

Wednesday, October 29, 2008

Steam Moist Chocolate Cake

My colleague gave me this recipe which I thought was very good. It didn't involve any baking - only steaming.


180g butter
1 cup of castor sugar (I cut down to 2/3 cup)
200g evaporated milk (I use low fat)
2 eggs, lightly beaten with a folk
1 cup of plain flour
1/2 cup of cocoa powder
1/2 tsp baking powder
1/2 tsp baking soda
1/2 tsp vanilla essence


1. Combine castor sugar, evaporated milk, vanilla extract or essence and butter in a saucepan over low heat.

2. When sugar is dissolved and butter is melted, off fire.

3. Add the beaten eggs into the slightly cold evaporated milk mixture and stir well.

4. Sift the flour, cocoa powder, baking powder and baking soda into a large mixing bowl then pour the eggs mixture over the flour and stir well.

5. Heat up the steamer and line and grease a 20cm baking pan.

6. Pour the batter into the pan and place the pans into the steamer. Cover the top of the pan loosely with a piece of aluminium foil.

7. Steam over medium heat for 45 mins.


Top layer looks watery due to condensation but the inside is fine.


(Source adapted: lazy chef)

Monday, October 27, 2008

My food photography workshop

I attended a 2-hr food photography workshop that taught me how to place the food products, some tips and tricks in placing the food and making the food look appetising. Of course, I also learnt about lighting, reflectors and use of various lenses. There were several lenses I could play with. 60mm macro and the L lens series of 24-200mm (if I can remember correctly)

Here are some shots of what I've taken. This was not taken in a studio - it is at the instructor's maisonette @ Bedok.
Here's the raisin walnut cake.


BreadTalk Cheese Bread

If bread could talk, it would say 'Cheese'!

Friday, October 24, 2008

Welcome to Bangkok, Thailand

Thai food is often associated with lemongrass, fish sauces and spices. That's what make it so aromatic and flavourful. Indeed during my trip to Thailand in October, I just had to try their local cuisine. And that includes street side hawkers. I have a weak stomach and I'm not so inclined towards street hawkers. (Okay I rate highly on the fear factor scale) I surveyed and prowled the streets for a 'decent' looking hawker where I can lay my taste buds on. I found one outside my hostel Suk 11. He sells chicken, beef and pork on sticks. The stall was pretty neat and clean. He is very organised with the seasonings, sticks, raw and cooked food. I paid only 10 baht for it. To my surprise from a roadside stall, the chicken tasted so good! It was tender, well seasoned and flavourful! It was definitely worth it. FYI 10 baht comes to about SGD $0.40. Basically meals in Thailand are very affordable. If you are comfortable with local non restaurant dishes, give them a try.

Ok this is not the one but similar to the one I tried

I plucked up the courage again next day and gave a go at one of the stalls in Chatuchat market. It was small, wet, dark and dirty. As I was hungry, I couldn't care less. Found a seat and the owner gave us a menu in English. I picked the safer choices of minced cooked chicken and a bowl of rice. I topped up with a papaya salad (one of their local specialties). The dish seemed somewhat unappetising and unpresentable. It looked so uncooked, and untasty. It lacked colours. The 'ugly' dish came with a messy and wet setting of the stall. Hence no pictures taken. But again to my surprise, it tasted so yummy! I took another bite. Indeed it was so well prepared. It had a little gravy and it was so perfect. The fried chicken we ordered was ordinary. Nothing to rave about as it was rather dry. Papaya salad was not too bad either. Total cost: 130 baht (SGD $5.80 for 2)

Dinner was a plate of fried noodles with pork. It was only 40 baht (SGD $1.70). Simple and enough to fill my growling tummy. Another local speciality which I love is the Pad Thai. A Singapore version of it which is my favourite, can be found at Thai Express. It's so delicious. It's actually fried noodles with prawns, diced beancurd, peanuts, eggs, shredded carrots and beansprouts. Sometimes they come with some cuttlefish. This Thai Pad Thai dish I ordered was only 90 baht in a restaurant setting. Imagine the savings.....

The portion was huge!

Breakfast at Suk 11 was simple but nice. It's a cosy backpackers' inn so breakfast was a simple affair of banana muffin, tea/coffee, croissant, sliced bread with butter or jam. Of course there were fruits to complement the breakfast. I smuggled in Milo on the 2nd morning :)


See the nice table setting?

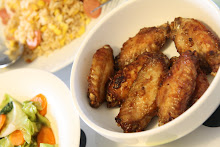
What's Thai food without Tom Yam Soup and Pineapple Rice? On our last day, we both agreed on trying Tom Yam Soup. We ordered this with Pineapple Rice and noodles again on the last day. It was a smaller serving but enough to make us salivate. 3 items came to only 480 baht (about $20.60 for 2).

It literally came in a pineapple

Of course you might have heard of people raving about the bird's nest and claypot shark's fin in Thailand. You can find that in Chinatown. Been there tried that a few years back. But try it if you haven't.


In a nutshell, food in Thailand is CHEAP! You can feast like a king and enjoy the delectable dishes right in front of you. It's not very spicy in case you are worried. In Singapore, try the authentic Thai dishes and forget about those hyped and commercialised restaurants. Go to First Thai along Purvis Street. It's located at the end of the street, next to Beach Road. The chef is a Thai and the whole coffeeshop is decorated with Thai ornaments, a pic of the Thai king and many other thai stuff. It's in the mid price level so it's quite okay. Try the Olive Fried Rice, Pineapple Rice, Fried Egg with Spinach and the Milk Tea. Of course add the meal with Chicken/Pork in Basil Leaves and end the meal with some Thai desserts.

:)

Friday, October 17, 2008

Coffee Cream Puff

This is similar to my earlier post of Chocolate Choux Puff (cream puff). Instead of chocolate, this time I used 2 tbsp of instant coffee mixed with 1 tbsp warm water to make the coffee filling. The rest of the method is the same. Enjoy!

This is how the puffs look like under 220 deg C.


Monday, October 13, 2008

Chocolate Choux Bun (aka Chocolate Cream Puff)

Sorry folks there isnt any nice pic for this one.. so here's the ecipe but I have the Ice Cream Puff (improved version) in my later posts :)

For the choux bun
65g plain flour (sifted)
2 eggs
50g butter
150ml water

For the chocolate buttercream

100g unsalted butter (softened)
80g icing sugar (orignial recipe calls for 225g!)
1 tbsp of warm water mixed with 1 tbsp cocoa powder

Method for Bun

Preheat the oven to 220 deg C. Beat the eggs in a small bowl. Cut the butter into cubes and put it into a saucepan of the water over low heat. As soon as mixture boils, take it off the heat. Quickly put the flour into the saucepan and mix well till it forms a dough ball. Add a litle egg and stir well until all the eggs are in. The mixture should be light. Spoon the mixture onto the lined trays and bake them for 10min. After 10min, bake them for another 25min at 190 deg C till puffy and golden brown. Remove the buns and poke them to remove extra steam. Meantime make the chocolate filling. When the buns are completely cooled, cut a slit in the buns and insert the filling. Then leave them to set on the wire rack.

Method for filling

Put the butter into a large mixing bowl and beat with wooden spoon till it becomes soft and creamy. Sift the sugar in and mix well. Lastly add the cocoa mixture and mix them altogether.

(Source: Usborne Kids Baking Book)

Sunday, October 12, 2008

Mango Cake - Almond Cake

I had intended to bake a Mango Sponge Cake. So I diced fresh mangoes and put into the batter to bake. Everything looked perfect. But the outcome somewhat wasn't very ideal. The sweet mango didn't go well with the batter as it baked. It became soggy and not so sweet. Maybe I shouldn't incorporate into the batter. It's either I place them on top the cake, or halfway into the baked cake with some whipped cream. Learnt something new. If I didn't try, I wouldn't know.. It was still edible, but not so ideal.

Anyhow I sprinkled some almond flakes and strawberries on top. The cake tastes good - minus the mangoes!


Tuesday, October 7, 2008

Cute and creative food pictures

My friends forwarded me this email which I found so beautifully cute and creative. Since it was a forwarded email, it's unfortunate that there isn't a source. If I can, I would credit the source But this is so beautiful that I want to share it.. You can click on the images for an enlarged version.

Enjoy!


Saturday, October 4, 2008

Sat morning treat - Raspberry Sponge Cake

I got up real early - 7am - on a Saturday morning. Hurried to the kitchen and started taking out all the equipment and ingredients for another baking session. Basically I prefer sponge cake over normal pound or butter cake as sponge cake is lighter in texture, not as dense as the usual cake and very importantly contains less butter. I don't feel so guilty after a while.


My first time that the cake surface doesn't break.

What you will need:

110 g plain flour
70 g melted butter
4 eggs
100 g sugar
1/2 tsp vanilla essence
1/2 cup raspberry (blend for about 2 sec)
Some icing sugar for dusting


Whisk eggs, sugar and vanilla essence till creamy. Fold in sifted flour and combine well. Lastly add in melted butter and mix well. Pour batter into a 20cm pan. Drop the chopped raspberry into batter and use a fork to mix well into batter (note that the raspberry will sink to the bottom, so avoid putting them in when pouring the batter) Bake at 180 deg C for about 30min.